Thursday, March 10, 2022

A Bar-End Mirror Mount

(for the throttle side of an old Airhead)

 
I had bar-end mirrors that I really liked on my '74 R90/6 Sidecar Rig.  They were stable but easily adjusted as the bars had solid ends which were drilled and tapped to mount the mirrors.

When I finally got around to mounting the same mirrors on my '76 R90/6, I found that the throttle side was problematic (there was not an issue with the clutch side).
 
The original mounting used a compressible rubber(?) cylinder which, if left loose enough so that the throttle returned on its own, the mirror would rotate.  If tightened enough so that the mirror was stable, the throttle could not return.  I could never find a good compromise.  
 
So, I decided to try making an internal expanding mount so that there would be no issues with the throttle rotation.
 
I will admit that I became fixed on making this fixture out of aluminum.  I now know that was likely not necessary (see below) but here's now I did it.
 
From a kind neighbor, I got a block of aluminum and hacksawed out a roughly 1" x 1" x 2" block.  Not having a lathe, I drilled the central hole and modified a bolt so that I could chuck it up in my 50s-era Delta drill press inherited from my Father. 

I then proceeded to make lots of aluminum chips - and it took a long time to get it to an OD that was a several thousandths less than the ID of the handlebar.
 
I then hacksawed it at about 45 degrees, as shown.


 Mounted, it worked out surprisingly well - and I am proud of my work.


But I now realize that it could have been a lot easier if I had chosen to make the fixture from either a really hard wood (hickory or maple) or even an old screwdriver handle.  
 

Still, I am pleased.  And it's done.
 
cln - Nick


Wednesday, December 30, 2020

Adding CAT to the QCX


I enjoy QRP CW and prefer the  N1MM Logger+  while contesting .  When Hans Summer  (G0UPL)  added the potential for computer communications to the firmware for his  QRPLabs  QCX models,  I was very interested.

Hans' latest incarnation of the QCX-style rig is the QCX+.  The  QCX+  has the hardware for computer communications built in, but the older  QCX  does not. 

You will need at least  firmware  version 1.03 (the latest version would be best), along with two resistors, a diode and a way to get the TTL data in and out .  For the connection to your PC, you will need a TTL to USB converter.  The later was the biggest expense by far.

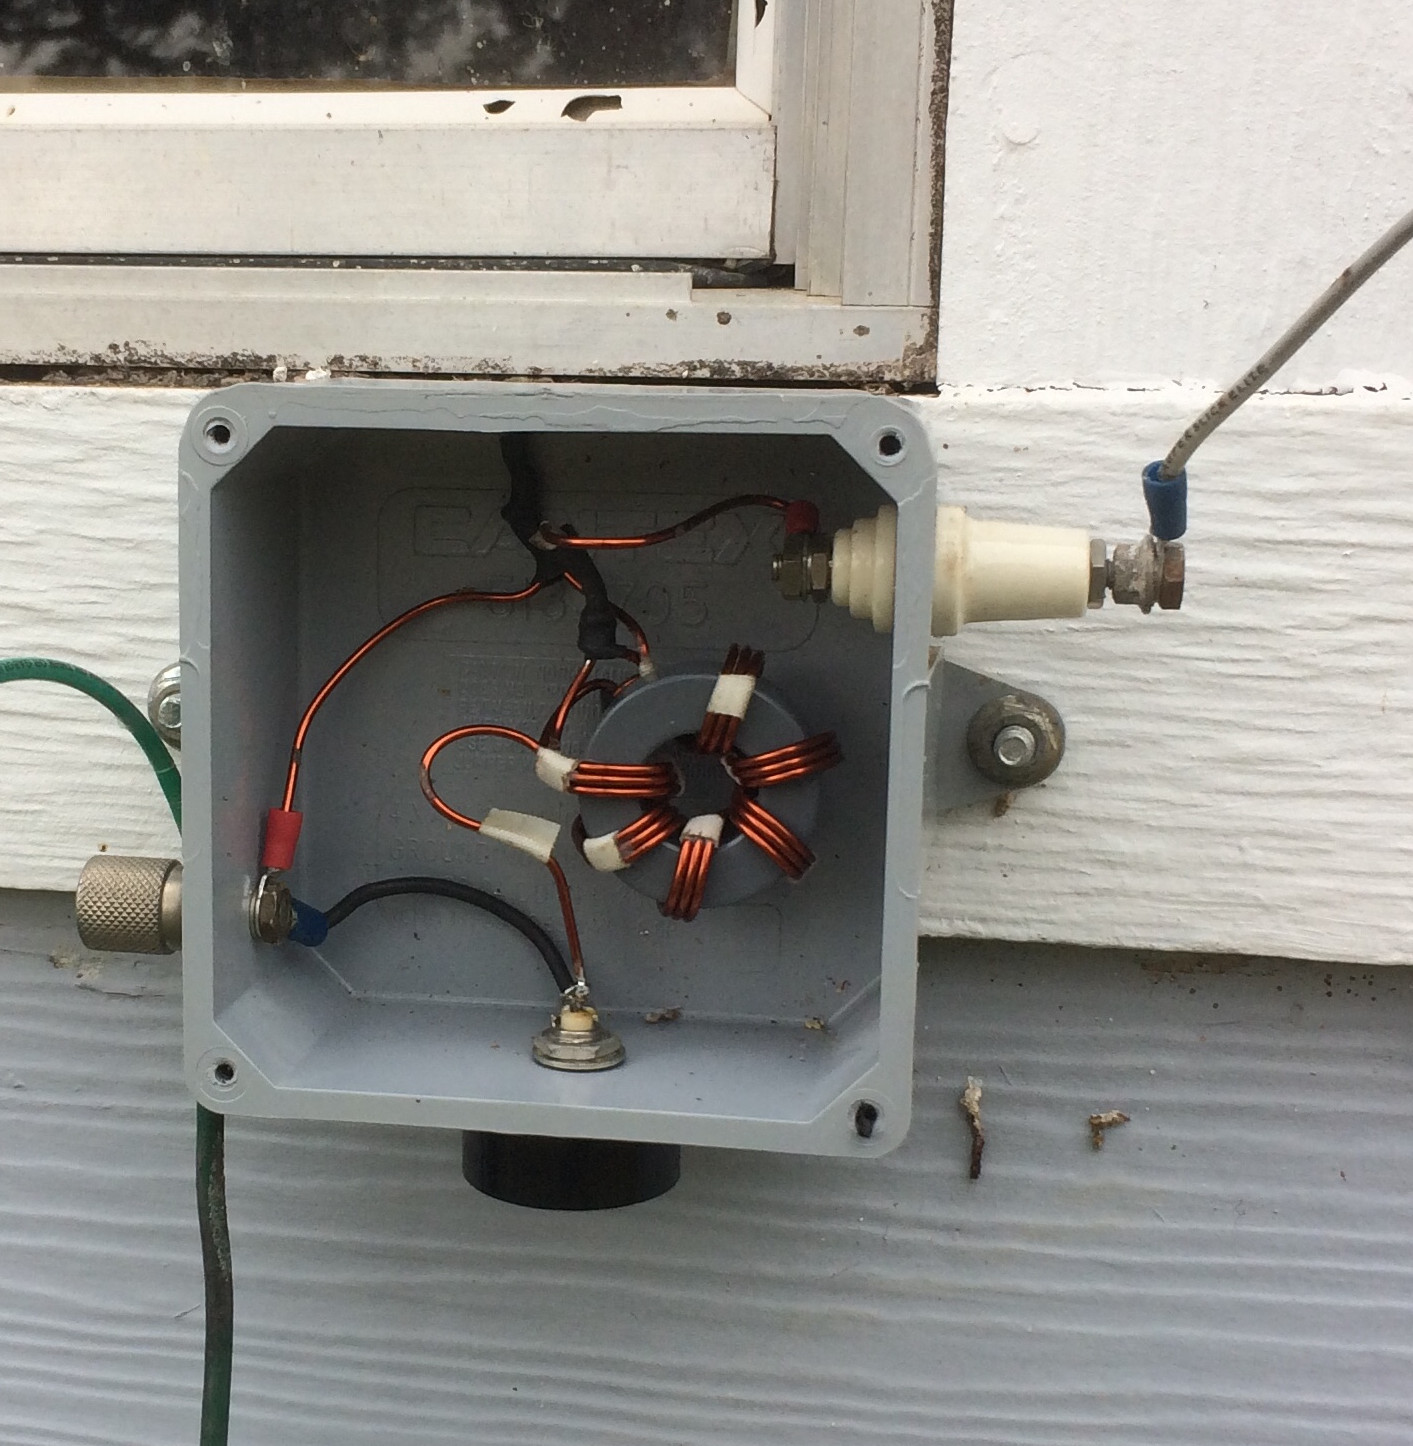
Below (mostly in pictures) is how I added the necessary hardware.  Notes and an example N1MM Contest Logger function key file follow.  

If you click on the images they will enlarge:


I got my parts from Mouser for about $10 plus shipping (I had four QCX transceivers to convert).  The TTL to USB cable was from Amazon for about $14 - but you only need one of those!  The 'DTEK DT-6562 USB TTL to 3.5mm audio jack serial cable' worked for me.  Be careful - there are non-working imitations out there...

I used very small stranded cable from the junkbox - and the colors helped me keep up with the leads after the shrink tubing was applied.. 

It is a tight squeeze to get the 3.5mm jack into position (and you may have to bend the shell, tip and ring connections to avoid the CW straight key), but the jack from Mouser conveniently nestles into the cutout  on the  BaMaTech  case which gives you a little more room.

Hans wrote notes on this mod that I would strongly urge you to read.  They are in the assembly manuals for the later models on   this page  and again, I would encourage you to check them out before attempting this mod.

I primarily use N1MM+ for contesting and I use the "CATA1ASC KY" commands to communicate with the QCX directly - no additional electronics other than the TTL to USB cable are needed.  Below is a function key file I use for the weekly  CWTs  sponsored by  CWOPS  that you might use as a model (after editing, of course).


#REM cwt.MC 
#REM  12-30-2020  wb5bkl 
F1 CQ cwt, {CATA1ASC KY cq cwt * * k;}
F2 Exch, {CATA1ASC KY ! {EXCH} ;}
F3 Tu, {CATA1ASC KY tu ;}
F4 {MYCALL}, {CATA1ASC KY * ;}
F5 His Call?, {CATA1ASC KY ! ? ;}
F6 DUPE, {CATA1ASC KY B4 e~e ;}
F7 QRZ?, {CATA1ASC KY QRZ? ;} 
F8 Agn?, {CATA1ASC KY agn? ;}
F9 Name?, {CATA1ASC KY name? ;}
F10 Nr?, {CATA1ASC KY nr? ;}
F11 Spcl, {CATA1ASC KY HNY e~e ;}
F12 Wipe, {WIPE}
#S&P ----------- Search and Pounce Messages begin here -----
F1 QRL?, {CATA1ASC KY qrl? {MYCALL} ;}
F2 Exch, {CATA1ASC KY {EXCH} ;}
F3 Tu, {CATA1ASC KY tu ;}
F4 {MYCALL}, {CATA1ASC KY * ;}
F5 His Call?, {CATA1ASC KY !? ;}
F6 1371, {CATA1ASC KY 1371 ;}
F7 NICK, {CATA1ASC KY nick ;}
F8 Agn?, {CATA1ASC KY agn? ;}
F9 Nr?, {CATA1ASC KY nr? ;}
F10 Nme?, {CATA1ASC KY name? ;}
F11 Spcl, {CATA1ASC KY HNY e~e ;}
F12 Wipe, {WIPE}
#REM ----------, Special instructions begin at end-of-file -
#REM, S&P F1 calls QRL? before placing the program in RUN mode
#REM, Designed to work in either ESM or non-ESM mode
#REM, F5 uses "!" macro for his callsign
#REM,


73 and good luck!

cln - Nick

WB5BKL


Sunday, October 25, 2020

K75 - Cleaning the Fuel Injectors -

Recently fuel tank contamination apparently did a number on the fuel pump and filter on my 1994 K75.  After cleaning the tank, I found, as expected, the fuel injectors were apparently blocked and not working.  

A search for help from local repair shops yielded nothing.  Sending them off to a BMW shop would be about $50 a pop - plus postage.

I elected to try to clean them myself.


I wish I could tell you I came up with this, but I did not.  Here is a link to the video where I got the idea.  He is working on injectors from a modern BMW R-bike.  His cleaner appears at about 7:30 into the video.

And to the right is my interpretation of the same cleaner.

The switch is a micro switch from the junk box.  I did not have the proper connector so I had to adapt some female connectors from a plug - also from the junk box.  The syringe I found for $1 in the veterinary department of our local feed store (click on the images to make them larger).  I did replace all the O-rings (FEL-PRO ES 70599  - at the local auto parts store) - about $8 for two packages of 4.


 The cleaner proved very successful.

 I used ethanol (denatured alcohol)  first, then B-12 Chemtool.  I think the ethanol did the most good for the contamination I had.  

Re-fitted the injectors to the rail (which I also cleaned),  buttoned everything up and the K75 started up after about 3 seconds of cranking.  

Very pleased.  My sincere thanks to Doug Rost.


cln

Tuesday, September 22, 2020

CWOPs in the Texas QSO Party


The TQP is my favorite 'big' contest each year. While doing my usual CW-QRP thing this month, I kept noticing that during a lot of QSOs, a name would pop into my head though not part of the exchange: Sam, Van, Marv, Chuck, Hank, John (lots of those), Claude and so on. I realized that they were familiar from the CWTs that I enjoy on Wednesdays. There were so many that I became curious about how many CWOPs I was working.

At first I thought it would take a little programing to answer the question but, at least in Linux, it was actually pretty easy.

First I went to the CWOPs website, found the member roster and downloaded a spreadsheet file with all the member calls listed. From that spreadsheet I copied only the calls (well over 2000 currently) to a file: CWOPs_members.txt - one call per line

Then I used a similar process on my TQP log but removed the dupes (for example I worked VE3NNT on 2 bands) before copying that data to another file: TQP_2020_uniques.txt - again one call per line

I used the Linux command grep to look at leach line in the first file and check for a match in the second file with output to Matches.txt:

grep -oFf CWOPs_members.txt TQP_2020_uniques.txt > Matches.txt

If I had only wanted a count, I could have used:

grep -oFf CWOPs_members.txt TQP_2020_uniques.txt | wc -l

I found that slightly over 46% of the contacts I made in the TQP were with CWOPs members. More than I thought. Almost half.

My thanks to each and every one of them. 


cln – Nick
WB5BKL
'599 BURN'


Thursday, August 6, 2020

An Omni-Angle Antenna for 6M

A while back, several posts on the CWOPS reflector caught my attention.  They mentioned openings on 6M during the weekly CWOPS Mini-tests.   That reminded me that my K3/10 has both 6M capability and a suitable preamp for that band. 

I am not ready to replace my rotatable antenna (a 2-element delta loop for 10 and 15M), so I looked for sometiing simpler but ideally omni-directional.  I settled on the Omni-Angle for 6M from PAR Antennas, as it seemed well constructed, got good reviews and was not too expensive.

Assembly was straight forward.  PAR Antennas has a video available which helped me with adjusting the antenna 'match'.  Since it was so small and lightweight, I elected to put it stepladder height on the tower and give it a try.  Here is an image:

And below is another image from the rear.  Mom and Pop Mockingbird were building a nest between the Omni-Angle and the tower brace.  I can imagine them saying, "There goes the neighborhood!"

Dustin, much younger than WB5BKL, climbs for me.  Here is an image of him, several weeks later,  almost done with mounting the Omni-Angle at my designated height.  Dustin reported that there were three eggs in the mockingbird nest.  We tried not to disturb them.


So far, I am very pleased. I used my FA-VA-4 antenna analyzer to adjust resonance to 50.090 MHz at stepladder height and Dustin made very slight changes when it was up in the air.  (Note that the camera was tilted, not the tower.  😉)

I made a couple of contacts with the antenna at stepladder height and then had fun in the ARRL VHF - making 8 contacts in very casual operation with the antenna up in the clear.

At 5W of course.  QRP CW.

Now  I watch 6M for openings!


cln
WB5BKL


Thursday, June 20, 2019

Popsicle or Ice Lolly QCX Stand

An easy prop for a QCX in the BaMaTech box.  If you like Popsicles (AKA ice lolly, freezer pop, ice pop, icy pole), this can be both a treat and cheap.  If you like kabobs (kebabs, etc), even better.

Construction images - not much to it.  Comments below.  Click on the images to enlarge them for details and to make my mistakes easier to see:


Note that the 'kick stand' skewer rotates in the bottom sticks.  The support skewers bear on the four QCX feet.

If I had it to do over, I would have made it wider and had the 'kick stand' to rotate within the lower Popsicle (ice lolly) sticks - that way it would fold flat for storage.   :-)    Oh well.

Well under an hour, excluding the gluing time.

cln - Nick
WB5BKL
Lake Buchanan

Wednesday, February 13, 2019

160M 1:2.25 Impedance Transformer

In order to try out 160M, I put up an inverted "L" and adjusted the length to resonance using an antenna analyzer (FA-VA4).  My frequency of choice was 1810 KHz - to match my QRP interests.

At this writing, I have 12 radials at the base, with various lengths of 15 to 40 feet over very rocky soil (granite, gneiss).

I did no modeling - just threw up some wire that fit my physical situation.  Impedance at resonance was around 24 Ohms.

I wound a test transformer on an old toroid of unknown characteristics just to see if I could get close to a 50 Ohms match.  That was successful and I even made several contacts at QRP levels.

I decided to wind a better (and I hope, more efficient) version.  I used a FT-150A-K core from  Amidon along with 10 feet of AWG#14 HAPT wire and some glass cloth tape.  The transformer I chose was the W2FMI-2.25:1-HU50 from the Amidon Transmission Line Transformers Handbook on the Amidon website.  this is a Jerry Sevick design.  I am, of course, using it 'backwards'...

To the right is the toroid as wound.  Sevick notes that the #14 takes some effort to wind and suggests leaving long leads on each end for leverage.  Good advice.

The image below shows (unclearly - sorry) the connections before soldering.

And here is the wired version with the "proof of concept " un-un to the left.  The box is an outdoor junction box (with water-sealed lid, not shown) that I picked up at a local big-box store.  Pretty handy.


And here it is as installed.  The BNC feed to the shack is at the bottom, the inverted "L" connects to the right and the ground and radials to the left.

So far, I am very pleased to get something cheap and easy working for 160M.  This might not be the best antenna, but for my circumstance it is up and working.   At 1810KHz, the antenna presents a SWR of about 1:1.1, rising quickly away from that QRP frequency.

I do appreciate Mr. Sevick's work. 

Now for more radials!

cln - Nick
WB5BKL
Lake Buchanan